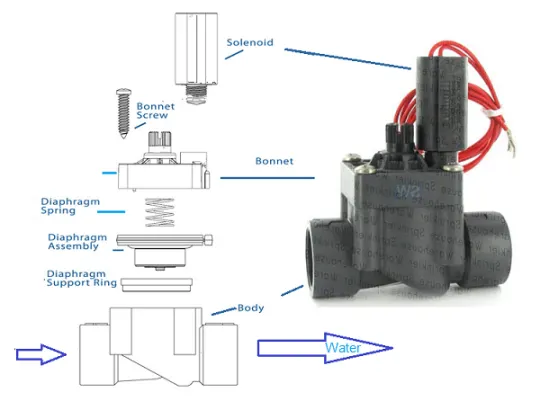
The heart of your irrigation system: the irrigation valve.


If the controller is the brains of your system the valves are the heart. They control the flow of water through the lines. They are very simple in both principle and design.

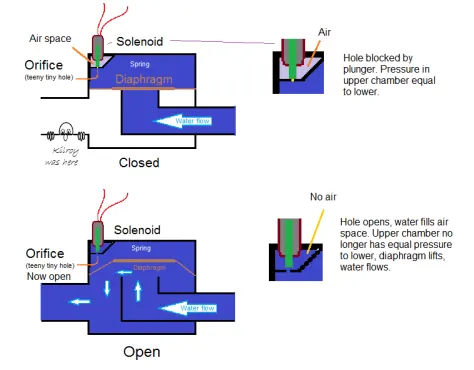
This is an example of a typical valve. Details may vary but execution is the same.

Valves have water both above and below the diaphragm. The upper chamber pressure is greater than the lower due to the combination of spring pressure and trapped water. They also have an air space under the solenoid with a bleed hole that is opened when the solenoid plunger is retracted (zone turned on).

Opening this hole lowers the pressure above the diaphragm, the water below forces the diaphragm up and water flows through. Most valves will not open with less than 15 to 20 pounds per square inch of pressure. This is only a concern with extremely low pressure; usually on gravity feed water tanks.

Picking a good valve is simple: stay with a name brand. After that you have few decisions to make. Most people use 1” valves. Simple reasons are they are the most economical, readily available, both new and parts, and provide the flow most residential and small commercial designs need. Even if your design calls for a ¾’ valve use 1”. It doesn’t cost more and if you make changes or expansions in the future you won’t be restricted by the smaller size. A 1” valve will allow up to 25% more flow than a ¾” valve.

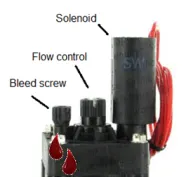
The next choice is flow control. Flow control is separate knob or screw on top of the valve and allows you to regulate the water going through the valve. In most cases flow control is not necessary but it does have advantages. If a valve sticks open, one of the more common valve failures, the flow control allows you force the valve closed. If your water pressure is low, either because of supply problems or overlapping valve operations, partially closing the flow control will help the valve close faster and more reliably. It’s cheap insurance to have.

Valves fail in consistent ways. It may not close completely. This could be due to debris, the most common reason, or worn diaphragms. Check out FILTRATION for how to prevent debris. Diaphragms do wear and age, generally resulting in a tear in the diaphragm. Just replace. For a very short video on how to do a repair look at . Valve bodies rarely fail unless suffering freeze damage or shovel hit.

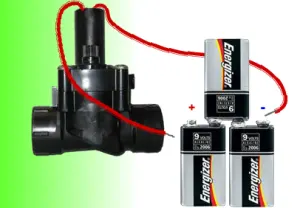
Solenoids will fail over time or the connections to the control box could have become corroded. Check the connections; make sure they are clean. For a simple way to test the solenoid:

 Steps in Creating a Portable Valve Activator.

  1. Take three 9-Volt Batteries
  2. Connect in a series
  3. Connnect one valve wire to the negative pole
  4. Then connect the other wire to the positive pole to activate the valve
  5. If the solenoid is functioning properly, you should hear a “click”

For a more involved but very easy and thorough way to test the solenoid and all wiring look at USING A MULTIMETER.

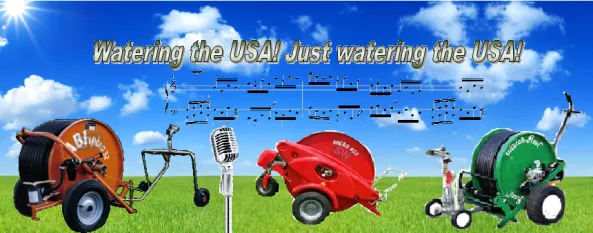
The Traveling Sprinklers! Weren’t they a rock group in the 80’s?


 Let’s face it. There are times when an underground sprinkler system just isn’t practical.  If you’re a school with a football field, baseball field, soccer field and track the cost to install a system can be prohibitive. You also lose use of the facility during installation and have to wait for the turf to re-grow.

Have a ranch and you just need to water some areas every now and then? Want to keep the dust down on the horse pens?  Multiple areas with crops on the farm and no irrigation? Neighborhood park dying from the heat?

Traveling sprinklers handle all of these with a song in their heart. Coverage ranges from a low of 54’ x 165’ to a huge 145’ x 595’ with gallons per minute from 3 to 95. That is some serious watering.

Most have hydraulic propulsion so all you add is water. One has a built in drive motor with rechargeable battery. None have MP3 players.

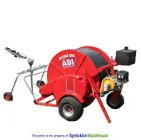
ABI IRRIGATION MICRO 505 The big boy first. The with a Honda 5.5 horse booster pump. This thing can put out 95 gpm and cover an area 131’ wide. With a hose length of 560’ that is some serious acreage on each pull. It handles supply pressure ranges of 35 to 96 psi.

Don’t have that much pressure? Check out the ABI IRRIGATION MICRO 25. It will give you 42’ wide with only 30psi with a hose length of 165’. That’s not bad at all.

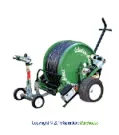
What? You don’t even have 30psi to work with? That’s no step for a stepper. Look at the KIFCO E110 ELECTRIC. It has an electric drive motor with rechargeable battery so your supply pressure requirement is smaller. At only 23psi you get coverage 85’ wide with a 280’ hose and around 30 hours per charge. Great for low or fluctuating pressure water supplies.

Each of these can handle terrain that is slightly unlevel or rough, as you would have on a farm or ranch. But what if you have a nice, smooth area that doesn’t need the all terrain capabilities? Maybe a nice, smooth football field?

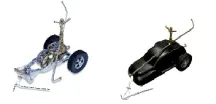
Now comes the Underhill T-400-Tracker. This thing puts out up to 85’ x 400’ of coverage on 85psi and 9 to 15gpm. Another advantage is it only weighs 58 pounds, compared to the 120 to 800 pounds of its big brothers. Running goal post to goal post helps keep the weight down.

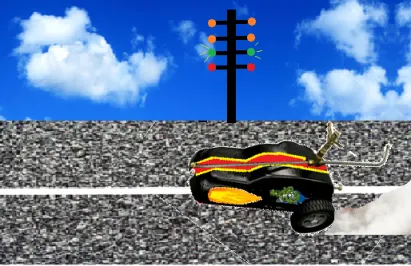
Finally we have the Buckner traveling sprinklers, the Rain Coach and Storm Cruiser. The Storm Cruiser is the Rain Coach with a cruiser shaped protective cover. These give you a coverage of up to 145’ x 450’ using a supply pressure of 55 to 75psi. It only weighs 56 pounds, making it easy to handle.Unlike the Tracker, it doesn’t keep its weight down by running the football field. It’s more of a hot-rod.

Look for the Sprinkler Warehouse sponsored Storm Cruiser at the next Traveling Sprinkler International Showdown!

There are more traveling sprinklers than I could show today. Start your browsing at Traveling Sprinklers and you’ll find what you need.

Pipe Dreams? Or PVC Pipe dreams? There is a difference.


If you don’t know the difference we can’t help you here. This is not that kind of a blog. If you have nightmares about figuring out which pipe to use for your irrigation then we can help.

PVC stands for polyvinyl chloride. PVC is easier to say. PVC pipe accounts for about two thirds of the water distribution market, including drinking, irrigation and waste. So far the material has been found to be inert, meaning it doesn’t absorb or release harmful chemicals. Unless you burn it. Don’t sniff burning PVC.  It’s no fun, painful and the smoke can be hazardous.

The most common question we get is a two-parter: what size pipe should I use and what kind: Schedule 40 or Class 200? Knowing the differences can help you create an efficient system.

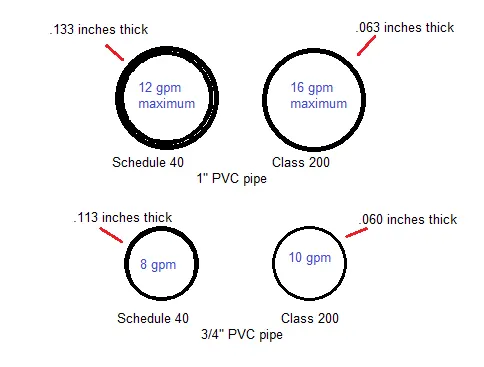
Remember the old “a picture is worth a thousand words” quote? I’ll give you a picture now and you can decide if you want to skip the other 476 words.

Let’s talk about Schedule 40 pipe first. It is the simplest. Schedule XX designates the wall thickness at a certain size. For example, a 1” pipe in schedule 40 has a wall thickness of .133”; schedule 80 has a wall thickness of .179”. Higher schedule = thicker wall.

You will care about this later. It does get more interesting, hopefully.

“Class” pipe is different and the original definitions go back to steam boilers. We’ll skip ahead. Class 200 pipe, the most common class pipe used in irrigation, is rated for 200 pounds per square inch pressure (psi) and has a wall thickness of .063” for a 1” pipe. Notice that is a lot thinner than schedule 40. This is about to become very important. Schedule 40, in comparison, is rated for 450 psi. This is not as important.

The average irrigation system is designed for about 30 to 50 psi. Plenty of safety factor built in. It is not, however, as much as you think. A poorly designed system can experience water hammer and a 60psi line can experience frequent surges of pressure up to about 170 psi. Still within safety range.

Now we can get into the “why do we care” part.  Everything in irrigation ties into gallons per minute. Your spray head puts out a certain number of gallons per minute (gpm). Your design revolves around it. If you have 13 gpm you can put six 2 gpm heads on that zone. Or four 2gpm and four 1 gpm. (Never design to the absolute max gpm.)

Look at the cross section of ¾” and 1” pipe both in schedule 40 and class 200. Check the comparative flows in the picture above. This difference in flow can make a big difference in how you design your zones. There are friction loss/flow charts available to help you.

So what do you choose? The rule of thumb is to use schedule 40 for the main line. Run it from the water meter, through the backflow and to the valves. Then use class 200 for the laterals, or after the valves.

Why schedule 40 when it allows fewer gallons per minute? Because the thick wall makes it tougher, harder to break. Your main is under constant pressure; the laterals are under pressure only when they are active and it is an open-end system. Before real pressure can build in your laterals the water is shooting out the sprays, keeping pressure down. Schedule 40 is more resistant to shovels (its sworn enemy), tent stakes, car tires, kids, dogs and other puncture/crack pressures.

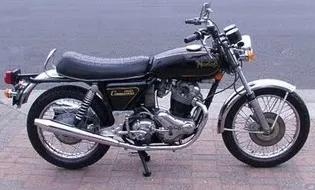
There are exceptions to everything. There are situations where an entire system should be done in class 200 pipes. Same for schedule 40.  Now that you know the difference you can make a more informed decision and start dreaming about better things, like a 1973 Norton Commando.

Backflow = upchuck? Eeeewww…


Most people know they need a backflow for their irrigation system. They just don’t know why. I’m going to work this backwards. First I’ll show what can happen if a backflow is missing or broken. Then I’ll tell you how they work and why you want one for your system.

From the West Virginia Department of Health and Human Resources: “One of the most highly publicized cases of a backflow incident occurred in 1969 at Holy Cross University. The football season was canceled due to a large outbreak of infectious hepatitis among the team members. It was determined that backflow through an unprotected lawn sprinkler system at the practice football field caused the epidemic. Children carrying the hepatitis virus routinely played in puddles around the sprinkler heads. Fire fighting demands in the vicinity caused negative pressures at the sprinkler heads backsiphoning the contaminated water into the drinking water supply to the field.

One of the most famous cases of backflow occurred in California. A laborer had been using an aspirator attached to a garden hose to spray a driveway with weed-killer containing arsenic. At sometime during his work, the water pressure reversed. The man then disconnected the hose and unwittingly drank from the hose bib. Arsenic in the waterline killed him.”

Thirsty yet? Try this from the Environmental Protection Agency: “In 1991, an atmospheric vacuum breaker valve intended to protect a cross-connection between an irrigation system and the potable supply malfunctioned, allowing backflow of irrigation water into the public water system. The water system, located in Michigan, was contaminated with nematodes, rust, and debris.

In 1981, chlordane and heptachlor were backsiphoned through a garden hose submerged in a termite exterminator’s tank truck in Pennsylvania. An undisclosed number of illnesses occurred, and 75 apartment units were affected.”

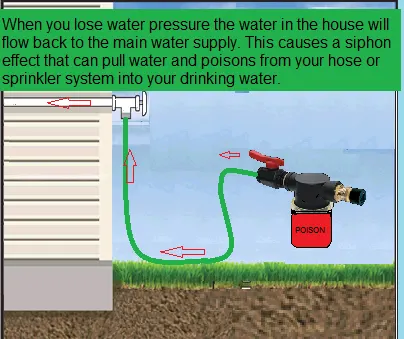
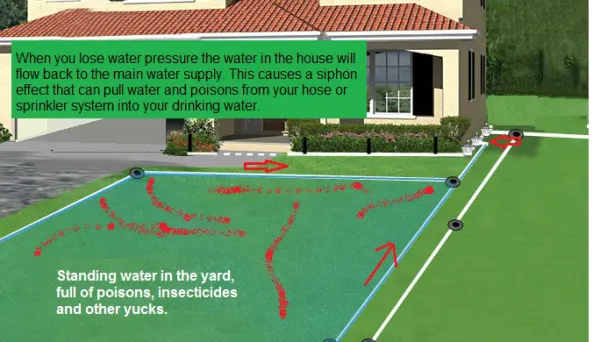
THE BASICS If you lose water pressure to your house, for whatever reason, the water in the house will flow out to the main line. Because pressure is now reversed, going from house to main line, it creates a siphon effect and will pull anything in the sprinkler system and in the puddles around the sprinkler system with it. If your garden hose was on at the same time it becomes a siphon hose. Now all the fertilizer, insecticide, animal waste and many other things you don’t want are pulled into the drinking water.

GARDEN HOSE Notice the two involving garden hoses? How many of us drink from a garden hose when working outside on a hot summer day? Ever use that same hose to put out pesticides or fertilizer? Have a backflow preventer on the hose bib? Cheap, cheap protection.

I think it is important at this time to note that our very talented graphics department has absolutely nothing to do with the illustrations in this article. I stole their work and added my own touches.  I get the blame.

IRRIGATION SYSTEM Same principal. Have another bad drawing. A backflow works by shutting down the irrigation water line when you lose water pressure. The simplest works just like a stopper in your bathtub: a plug falls down, blocks the line. They get far more complicated, depending on application.

Don’t listen to your neighbor, me, anyone else on what type of backflow you should get. Ask your city or county or your water provider. In my area a pressure vacuum breaker is plenty. Two miles away a new jurisdiction starts and they insist on double-checks. Always verify local code requirements first.

To find out the different types of backflows look at the backflow section on sprinklerwarehouse.com. To learn more about how they work check out backflows in Sprinkler School.

And stop drinking from your garden hose until it’s protected. Lemonade sounds better anyway.

How to Install a Sprinkler System?


You want to know how to DIY Irrigation System? How to install a Sprinkler system on your own?
A well designed, properly installed lawn sprinkler system makes it easy to water your home landscape and adds value to your property. On the other hand, a poorly designed, improperly installed system is inefficient, wastes water, can damage brick, siding, and fencing, and can be a maintenance nightmare. Here are some of the things you need to know to do it right.

First and foremost, the system needs to be designed properly:
For a DIY sprinkler system project, it is very important to start with a good design. It is nearly impossible to get good results if the system isn’t designed right from the beginning. You need to know how much water pressure and flow you have available. There is no rule of thumb. If you have a large water meter and a small property, you may be able to divide your property up into three or four zones and have adequate flow and pressure to make the system work. On the other hand, with a large lot and a small well, you might need 15 or 20 zones.

If you are on a well, do your “Home Work”
As there can be issues with the pump cycling on and off, water quality, etc. Zones that are sized too small or large can damage your pump. You may also need a sand separator or filter installed to prevent valves and sprinkler heads from becoming fouled. Visit www.IrrigationRepair.com for detailed info on using pumps with your irrigation / lawn sprinkler system.

If you are on a city water meter, first check your local codes about the use of a backflow device to protect the drinking water.
Most cities require some type of backflow prevention device and the requirements vary. Many areas allow a double check valve assembly (DCA), which in some places may be installed below ground in a box, while others will only allow a pressure vacuum breaker (PVB), which must be installed above ground and protected from freezing. Other areas only allow a reduced pressure principle device (RPZ), which also must be installed above ground. In some cases, atmospheric vacuum breakers (AVB) may be used, but these must be installed on each zone after the valve, with no additional valves downstream and may not be subject to continuous pressure. If the proper backflow prevention device is not used, there is a risk of contamination to the public drinking water supply. In

some cases you will be required to get a permit, have your system inspected, and have the backflow device tested for proper operation. Many cities and some states also now require that a rain sensor be installed on new systems. This device shuts the system off automatically when it rains.

A rain shut off device will pay for itself very quickly in saved water.

Next, you need to know the static water pressure in your water main.
You can measure this by connecting a pressure gauge to a hose adapter and attaching it to a hose bib on the outside of your house. Make sure no water is being used inside the house and then turn on the faucet. The gauge will read the current pressure inside the city water main. You might want to take several readings as the pressure can vary throughout the day. In many cities the pressure varies throughout the city depending on the time of day and the demand for water.

Spray Heads and Rotor Heads:
The design pressure is the pressure required at the sprinkler nozzle for it to perform properly.
Spray heads work best at about 25-30 psi, while rotors work better at 40-50 psi. It is important that there be sufficient flow and pressure to the nozzles so that they provide proper coverage. Otherwise there will be dry spots in the lawn. It is also important to match the precipitation rates of the nozzles. Most spray heads already have matched precipitation rates for the various nozzles within a manufacturer’s product line, but with rotors, it is important that the proper nozzles be selected.

(Each rotor you buy from  www.SprinklerWarehouse.com will come with a full set of standard nozzles). If you use the same size nozzle for different rotors that are watering a quarter circle, a half circle, and a full circle, then some areas will be overwatered, while others under watered. The full circle rotor is covering four times the area of the quarter circle, so it needs to have a nozzle that is putting out four times as much water. It is also important to group plants that have similar watering requirements together in a zone and water them at the same time.

To get the proper size zone, one must know the flow capacity of the meter.
For example, a typical one inch meter can provide a flow of about 25 gallons per minute with a pressure loss of 4.0 psi. Take the static pressure and allow some safety margin (many recommend 10%). So for a static pressure of 50 psi, you might consider a working pressure of 45 psi, then calculate the friction loss through the supply line from the city water main (usually a copper line), the meter itself, the backflow prevention device, the pipelines, the valves, pressure regulators (if used), and finally arrive at the design pressure. If there is not sufficient pressure, then a person might need to make the zones smaller or increase the flow and pressure by having a larger meter installed. Needless to say, there are a lot of factors to consider when designing a system. This issue is important so let’s go into it with a little more detail to help you out.

You will need to base your design on the gallon per minute (gpm) flow and the pressure you have available. The available flow will dictate the max gpm size of your zones our sections, and the available pressure will dictate the size of pipe and the types of sprinkler heads you will be able to use (sprays or rotors).

There are 3 rules you must follow when determining your flow and working
pressure:
1. Do not go beyond 75% of the maximum safe capacity for the water meter.
2. Do not exceed 10% of the static water pressure as a pressure drop through the water meter.
3. Do not go beyond velocities of 5 to 6 feet per second in the service line which feeds the water meter from the city main.

To calculate the exact maximum flow through your water meter you should refer to Chapter 10 in the book Simplified Irrigation Design or you can determine available pressure and flow from the flowing link at www.SprinklerWarehouse.com’s Sprinkler School

There are entire books written on the subject of hydraulics and proper design. Even if you decide you want to install your system yourself, consider reading one of the books offered at www.SprinklerWarehouse.com Book Store

Buy the best parts you can afford.

Do not skimp. Professional grade materials last longer and require less maintenance. Especially do not buy the cheap do-it-yourself sprinkler timers they sell at the big box stores. You will be using your controller regularly, so buy a sturdy, easy-to-program controller like the pros use. You won’t regret it.www.SprinklerWarehouse.com sells nothing but professional grade sprinkler parts and supplies. We ship extremely fast and we offer you the lowest prices on the web…. We want you business and we plan to earn it!

Call to get the utilities located and marked.
With a proper design in hand and several boxes full of parts, you are now ready to install. But wait, first call to get the utilities located. In most states, you must call before you dig. In many areas you can call 8-1-1 and have most of the utilities located free of charge. You must usually call at least two working days before you can commence digging. Gas, water, and sewer lines are usually not located past your property line, so you may need to locate these yourself. Be careful, although breaking a water line can be a big nuisance, cutting a gas line with a shovel or trencher can be deadly. Also, avoid placing pipelines near trees. Not only will tree roots cause problems in the future, cutting a trench too close to a tree can cause the tree to eventually die.

Trenching:
Let us assume that you are using PVC pipe. The shorter pipe lines can be hand dug with a trenching shovel. For longer lines, you might need to rent a trencher. Be sure to follow the instructions to the letter. Think of a trencher like a large chainsaw that cuts through the earth. Stay clear of the moving teeth, as they can cause serious bodily injury.

We recommend trenching by hand placing the sod (grass) on one side of the trench and the dirt on the other so when it comes time to bury the trench you will be able to put all the dirt back and then puzzle piece the grass back and make it hard to notice you trenched the yard. See our section on trenching at the following link IrrigationRepaire – How to Dig Treches

Piping:
In some areas, the pipe is installed deep enough that it won’t freeze. This is primarily done in southern states. In northern states, the pipe is generally installed with blow out connections so that the air can be removed before winter sets in. In any case, place the pipe at the depth recommended for your area.

When cementing pipe, be sure to cut the pipe square and clean off any burrs. Be sure to use primer on the fittings and then apply the cement while the primer is still wet. Purple primer is used by many contractors because of its visibility and is required in some areas. When connecting pipes together, be sure to measure carefully and make square connections. Pipe joints that are in a bind will eventually fail.

Valves:
Valves should be installed in a large enough box that they can be easily maintained. Some folks like to see how many valves they can fit in one box. This is a bad idea. Valves will eventually need to be repaired or even cut out and replaced, so leave room to work. If you are using spray heads and have lots of pressure, it is a good idea to install a fixed rate pressure regulator downstream of the zone valve to cut the pressure down. Spray heads typically mist and waste water at pressures higher than 30 psi. If you do this, make sure the regulator is properly sized for the flow delivered, and make sure there are no other valves downstream.

Sprinkler Wiring:
Unless prohibited by local code, you can place the sprinkler cable in the same trench as the pipelines. Wherever the cable comes up out of the ground to go into the house or up to the controller, be sure to place it in a conduit to protect from damage by the weed whacker. For most residential applications, 18 gauge multi-stranded cable is the right product to use. For larger properties, though, a bigger gauge might be needed. Do not use smaller gauge doorbell wire. It is not designed to be buried and will eventually give you trouble. Be sure to use waterproof splices that are filled with silicone where you make your connections to the valves. Other types of splices will fail. In most installations, you will use the white wire as the common. The common wire connects to all valves via one of the two wires leading to each valve. You will need to connect the other valve wire to its own individually color coded wire. At the other end of the cable, you will generally connect the white wire to the common terminal screw and the proper colored wire to each station. If you are using a rain or freeze sensor, you may need to make some changes. Consult your controller and sensor manuals for best results.

Installing Sprinkler Heads:
When you install a sprinkler head, it is best to install it on a flexible swing joint. This way you can place the head at grade. Some people like to use cutoff nipples. These are cheap and easy to use, but when the pipe eventually sinks, it pulls the head down with it. Then the head is below grade. When the nozzle retracts, it sucks in dirt and debris and eventually the nozzle clogs. The other possibility is dirt getting stuck in the seal. Then the head gets stuck in the up position and eventually run over by the lawn mower. Just use a swing joint, install the head at the proper grade, and avoid this problem.

Also when installing heads, place them several inches away from the house, fence, and sidewalk. This makes it easier to avoid overspray. Heads placed against the sidewalk will be damaged by an edger.

Backfilling the Trenches:
When backfilling the trenches, pile the dirt up gently on top of the trench, but don’t tromp it down just yet. Carefully distribute the soil and then you can “water pack” the ditches. Take a piece of pipe and attach to a garden hose. Turn the water on low and poke the pipe down into the bottom of the ditch. Watch as the soil begins to sink down into the ditch. When you start to see water appear, move on to the next spot. Don’t apply so much that the ditch starts to get muddy or water flows out of the ditch. You just want to apply enough that the soil starts to settle in the ditch. Once you have settled what you can without making a mess, put on a pair of rubber boots and “walk the ditches”, being careful not to sink in! If you put too much water on, you might get stuck. Once you have completed this step, you can rake a bit more dirt onto the ditches. If you do this right, you won’t have settling problems later.

Nozzle up the Sprinkler Heads:
Before putting nozzles on the heads, turn on each station to flush any dirt out of the lines. Once you have flushed the lines and are certain each valve is operating properly, install the correct nozzles. Double check to make sure heads are straight and installed at the proper grade. Adjust the arc and throw to make sure only the grass and landscape is being watered. Change nozzle sizes where necessary to avoid watering the house, the fence, or the street. Once your system is complete, call for the system to be inspected, if applicable.

Finally, measure the precipitation rate of each zone and water each zone according to its needs. Remember that the needs of the plants will change throughout the seasons. You can calculate the precipitation rate for each zone by measuring the flow rate through the meter in gallons per minute. Take this number, divide by the square feet in this zone and multiply by 96.3. This will give you the average precipitation rate for this zone in inches per hour.

After your system is installed, maintain it regularly. You can have a beautiful landscape and save water with a well-designed system that is properly installed, operated, and maintained.

Again, I hope this is of some value. As always, please help preserve ourwater resources, and irrigate responsibly. If you need any irrigation help, please leave a comments or visit IrrigationRepair.com
Understanding Lawn Sprinkler System


Are you looking for irrigation help? need a sprinkler guide to get started? These are the basic components of a residential irrigation sprinkler system, aside from design standards and techniques, I hope this will help you understand the individual components of the irrigation system and the function they perform.

a) Water Source

Familiarize yourself with where the water comes from for your irrigation system. Many areas are now using recycled or “reclaimed” water for the purpose of watering turf grasses and landscaped areas. Ask your builder or homeowners association if your home uses this type of water and where you would expect to shut it off in the event of an emergency or for maintenance issues.

Some areas are still using municipal or “city” water for irrigation. If this is the case, instead of one, there will be two, back-flow prevention devices near the water meter itself. They are typically at least 12″ off the ground and are made of bronze. One of these two devices would be for the sprinklers and the other one would service the home. This is where you would turn off the water for your sprinklers.

Even though they are becoming a little more restricted, some homes have their own well and pump or they may pump water from an adjacent lake. In either case there will be related pumping equipment to supply water for your sprinklers. If you are not sure how to stop the water flow from the pump, be sure and speak with your irrigation professional. If the system is not shut down properly severe pump damage or failure could occur.

Finally, some areas or developments have a large pumping station that delivers water to the entire subdivision. As with the reclaimed water scenario, make sure you know where to shut the water off for your individual property.

b) Controller/Timer

Your sprinklers will either operate from a controller located on the interior or exterior wall of the garage, or they may operate from a central control system. In some cases where a single residential property has its own pump, the controller could be located near the pumping equipment.

In the event that you have an individual controller for the property, familiarize yourself with how to switch the power off to the controller. Sometimes this will eliminate an emergency situation in the event that the sprinklers will not shut off. Irrigation controllers require high voltage to operate them, you should not have to remove any screws or take anything apart. If a malfunction of the controller is suspected, it should only be serviced by your irrigation professional.


c) Rotary Sprinklers

Any given property may or may not have rotary sprinklers installed. They are generally used in large turf areas that are 20′x 20′ or more. They will shoot a large stream of water and will oscillate back and forth slowly. Rotary sprinklers operate on the same basis as the older impact or “knocker head” sprinklers, but most of them are gear driven these days, which makes them much quieter.

d) Stationary Sprinklers

Stationary sprinklers or “spray heads” are used in smaller turf areas and may be used in landscape beds as well. Spray heads pop up out of the ground but do not move. They spray more of a mist, compared to rotary sprinklers. Spray heads come in 4″, 6″ and 12″ heights. The size that is used depends on the type of turf grass or the sprinklers specific location in a landscape bed. The landscaped areas of the home may also have what is referred to as a standpipe. These are nothing more than a spray head nozzle attached to a fixed riser in order to attain sufficient clearance over the closer plants so the water can reach the distant plants.

e) Drip/Low Volume Irrigation

Low Volume or “Drip” is commonly used in landscape and planting beds. Most drip irrigation products use numerous emitters that are closer to the root zone of the plants. However each emitter lets out a very small amount of water compared to a spray head. This makes the watering process a very efficient operation, because you are targeting only the specific areas that you want to water. The water is applied at a much lower rate, reducing run off and you don’t lose your water to the wind or evaporation. Drip irrigation is mandatory in many areas. If you don’t see any water spraying in the planted areas around the home chances are that drip has been installed.

In almost all cases, drip irrigation zones require a pressure regulator and filter. The orifice that emits the water is very small, therefore making it very prone to clogs from foreign matter in the water. More on the filter will be covered in the maintenance section.

f) Flood Bubblers

Flood bubblers are only used under certain circumstances. They come in fixed rates and there are also adjustable bubblers. A fixed rate bubbler is ideal because you actually know how much water your going to apply to the plant it’s designed for. Bubblers may be used where large trees are located on the top of a berm where run off, or good saturation is a concern. The most common place you would find one on a residential home would be in a very small planting area. These areas are generally under the coach light on the same side of the garage, as the font door of the home.

g) Rain Sensing Devices

Rain sensing devices or “rain sensors” are devices that cease all watering in the event sufficient rainfall is detected. They are usually located near the controller, sometimes on the eave of the roof or mounted on conduit pipe in the landscape bed. Rain sensors have been mandatory components of an irrigation system’s in many states for several years now and should be checked for proper operation regularly.

h) Control Valves

Almost all irrigations systems have an individual control valve for each station or “zone”. They are usually located at random intervals around the home with only the lid visible. The lid on most control valves will be about 6″ in diameter and green or purple in color. The purple lid indicates that the water comes from a non-potable source; most often this means it is reclaimed water. If there is a considerably larger box that is rectangular in shape it may house multiple control valves or the filter for the drip irrigation if applicable. Aside From filter maintenance, the control valves should only be repaired by qualified persons.

Again, I hope this is of some value. More irrigation instructions and sprinkler system help articles will be posted, please check back regularly. As always, please help preserve our water resources, and irrigate responsibly.