You want to know how to DIY Irrigation System? How to install a Sprinkler system on your own?
A well designed, properly installed lawn sprinkler system makes it easy to water your home landscape and adds value to your property. On the other hand, a poorly designed, improperly installed system is inefficient, wastes water, can damage brick, siding, and fencing, and can be a maintenance nightmare. Here are some of the things you need to know to do it right.
First and foremost, the system needs to be designed properly:
For a DIY sprinkler system project, it is very important to start with a good design. It is nearly impossible to get good results if the system isn’t designed right from the beginning. You need to know how much water pressure and flow you have available. There is no rule of thumb. If you have a large water meter and a small property, you may be able to divide your property up into three or four zones and have adequate flow and pressure to make the system work. On the other hand, with a large lot and a small well, you might need 15 or 20 zones.
If you are on a well, do your “Home Work”
As there can be issues with the pump cycling on and off, water quality, etc. Zones that are sized too small or large can damage your pump. You may also need a sand separator or filter installed to prevent valves and sprinkler heads from becoming fouled. Visit www.IrrigationRepair.com for detailed info on using pumps with your irrigation / lawn sprinkler system.
If you are on a city water meter, first check your local codes about the use of a backflow device to protect the drinking water.
Most cities require some type of backflow prevention device and the requirements vary. Many areas allow a double check valve assembly (DCA), which in some places may be installed below ground in a box, while others will only allow a pressure vacuum breaker (PVB), which must be installed above ground and protected from freezing. Other areas only allow a reduced pressure principle device (RPZ), which also must be installed above ground. In some cases, atmospheric vacuum breakers (AVB) may be used, but these must be installed on each zone after the valve, with no additional valves downstream and may not be subject to continuous pressure. If the proper backflow prevention device is not used, there is a risk of contamination to the public drinking water supply. In
some cases you will be required to get a permit, have your system inspected, and have the backflow device tested for proper operation. Many cities and some states also now require that a rain sensor be installed on new systems. This device shuts the system off automatically when it rains.
A rain shut off device will pay for itself very quickly in saved water.
Next, you need to know the static water pressure in your water main.
You can measure this by connecting a pressure gauge to a hose adapter and attaching it to a hose bib on the outside of your house. Make sure no water is being used inside the house and then turn on the faucet. The gauge will read the current pressure inside the city water main. You might want to take several readings as the pressure can vary throughout the day. In many cities the pressure varies throughout the city depending on the time of day and the demand for water.
Spray Heads and Rotor Heads:
The design pressure is the pressure required at the sprinkler nozzle for it to perform properly.
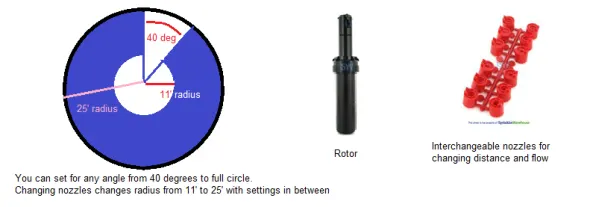
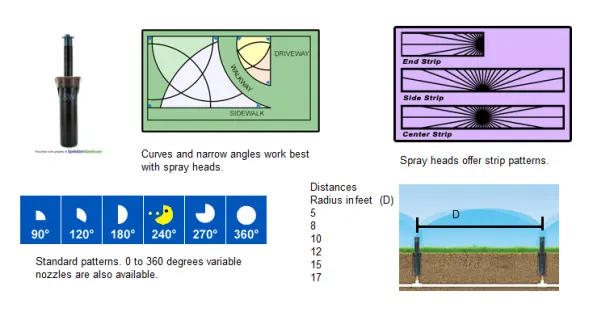
Spray heads work best at about 25-30 psi, while rotors work better at 40-50 psi. It is important that there be sufficient flow and pressure to the nozzles so that they provide proper coverage. Otherwise there will be dry spots in the lawn. It is also important to match the precipitation rates of the nozzles. Most spray heads already have matched precipitation rates for the various nozzles within a manufacturer’s product line, but with rotors, it is important that the proper nozzles be selected.
(Each rotor you buy from www.SprinklerWarehouse.com will come with a full set of standard nozzles). If you use the same size nozzle for different rotors that are watering a quarter circle, a half circle, and a full circle, then some areas will be overwatered, while others under watered. The full circle rotor is covering four times the area of the quarter circle, so it needs to have a nozzle that is putting out four times as much water. It is also important to group plants that have similar watering requirements together in a zone and water them at the same time.
To get the proper size zone, one must know the flow capacity of the meter.
For example, a typical one inch meter can provide a flow of about 25 gallons per minute with a pressure loss of 4.0 psi. Take the static pressure and allow some safety margin (many recommend 10%). So for a static pressure of 50 psi, you might consider a working pressure of 45 psi, then calculate the friction loss through the supply line from the city water main (usually a copper line), the meter itself, the backflow prevention device, the pipelines, the valves, pressure regulators (if used), and finally arrive at the design pressure. If there is not sufficient pressure, then a person might need to make the zones smaller or increase the flow and pressure by having a larger meter installed. Needless to say, there are a lot of factors to consider when designing a system. This issue is important so let’s go into it with a little more detail to help you out.
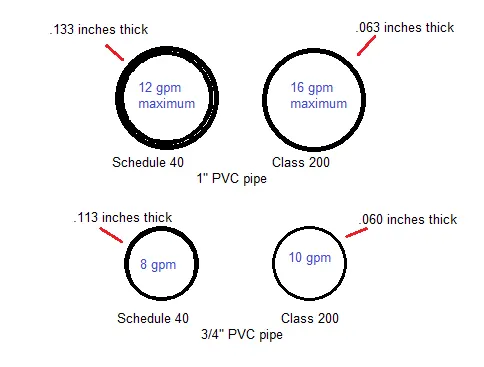
You will need to base your design on the gallon per minute (gpm) flow and the pressure you have available. The available flow will dictate the max gpm size of your zones our sections, and the available pressure will dictate the size of pipe and the types of sprinkler heads you will be able to use (sprays or rotors).
There are 3 rules you must follow when determining your flow and working
pressure:
1. Do not go beyond 75% of the maximum safe capacity for the water meter.
2. Do not exceed 10% of the static water pressure as a pressure drop through the water meter.
3. Do not go beyond velocities of 5 to 6 feet per second in the service line which feeds the water meter from the city main.
To calculate the exact maximum flow through your water meter you should refer to Chapter 10 in the book Simplified Irrigation Design or you can determine available pressure and flow from the flowing link at www.SprinklerWarehouse.com’s Sprinkler School
There are entire books written on the subject of hydraulics and proper design. Even if you decide you want to install your system yourself, consider reading one of the books offered at www.SprinklerWarehouse.com Book Store
Buy the best parts you can afford.
Do not skimp. Professional grade materials last longer and require less maintenance. Especially do not buy the cheap do-it-yourself sprinkler timers they sell at the big box stores. You will be using your controller regularly, so buy a sturdy, easy-to-program controller like the pros use. You won’t regret it.www.SprinklerWarehouse.com sells nothing but professional grade sprinkler parts and supplies. We ship extremely fast and we offer you the lowest prices on the web…. We want you business and we plan to earn it!
Call to get the utilities located and marked.
With a proper design in hand and several boxes full of parts, you are now ready to install. But wait, first call to get the utilities located. In most states, you must call before you dig. In many areas you can call 8-1-1 and have most of the utilities located free of charge. You must usually call at least two working days before you can commence digging. Gas, water, and sewer lines are usually not located past your property line, so you may need to locate these yourself. Be careful, although breaking a water line can be a big nuisance, cutting a gas line with a shovel or trencher can be deadly. Also, avoid placing pipelines near trees. Not only will tree roots cause problems in the future, cutting a trench too close to a tree can cause the tree to eventually die.
Trenching:
Let us assume that you are using PVC pipe. The shorter pipe lines can be hand dug with a trenching shovel. For longer lines, you might need to rent a trencher. Be sure to follow the instructions to the letter. Think of a trencher like a large chainsaw that cuts through the earth. Stay clear of the moving teeth, as they can cause serious bodily injury.
We recommend trenching by hand placing the sod (grass) on one side of the trench and the dirt on the other so when it comes time to bury the trench you will be able to put all the dirt back and then puzzle piece the grass back and make it hard to notice you trenched the yard. See our section on trenching at the following link IrrigationRepaire – How to Dig Treches
Piping:
In some areas, the pipe is installed deep enough that it won’t freeze. This is primarily done in southern states. In northern states, the pipe is generally installed with blow out connections so that the air can be removed before winter sets in. In any case, place the pipe at the depth recommended for your area.
When cementing pipe, be sure to cut the pipe square and clean off any burrs. Be sure to use primer on the fittings and then apply the cement while the primer is still wet. Purple primer is used by many contractors because of its visibility and is required in some areas. When connecting pipes together, be sure to measure carefully and make square connections. Pipe joints that are in a bind will eventually fail.
Valves:
Valves should be installed in a large enough box that they can be easily maintained. Some folks like to see how many valves they can fit in one box. This is a bad idea. Valves will eventually need to be repaired or even cut out and replaced, so leave room to work. If you are using spray heads and have lots of pressure, it is a good idea to install a fixed rate pressure regulator downstream of the zone valve to cut the pressure down. Spray heads typically mist and waste water at pressures higher than 30 psi. If you do this, make sure the regulator is properly sized for the flow delivered, and make sure there are no other valves downstream.
Sprinkler Wiring:
Unless prohibited by local code, you can place the sprinkler cable in the same trench as the pipelines. Wherever the cable comes up out of the ground to go into the house or up to the controller, be sure to place it in a conduit to protect from damage by the weed whacker. For most residential applications, 18 gauge multi-stranded cable is the right product to use. For larger properties, though, a bigger gauge might be needed. Do not use smaller gauge doorbell wire. It is not designed to be buried and will eventually give you trouble. Be sure to use waterproof splices that are filled with silicone where you make your connections to the valves. Other types of splices will fail. In most installations, you will use the white wire as the common. The common wire connects to all valves via one of the two wires leading to each valve. You will need to connect the other valve wire to its own individually color coded wire. At the other end of the cable, you will generally connect the white wire to the common terminal screw and the proper colored wire to each station. If you are using a rain or freeze sensor, you may need to make some changes. Consult your controller and sensor manuals for best results.
Installing Sprinkler Heads:
When you install a sprinkler head, it is best to install it on a flexible swing joint. This way you can place the head at grade. Some people like to use cutoff nipples. These are cheap and easy to use, but when the pipe eventually sinks, it pulls the head down with it. Then the head is below grade. When the nozzle retracts, it sucks in dirt and debris and eventually the nozzle clogs. The other possibility is dirt getting stuck in the seal. Then the head gets stuck in the up position and eventually run over by the lawn mower. Just use a swing joint, install the head at the proper grade, and avoid this problem.
Also when installing heads, place them several inches away from the house, fence, and sidewalk. This makes it easier to avoid overspray. Heads placed against the sidewalk will be damaged by an edger.
Backfilling the Trenches:
When backfilling the trenches, pile the dirt up gently on top of the trench, but don’t tromp it down just yet. Carefully distribute the soil and then you can “water pack” the ditches. Take a piece of pipe and attach to a garden hose. Turn the water on low and poke the pipe down into the bottom of the ditch. Watch as the soil begins to sink down into the ditch. When you start to see water appear, move on to the next spot. Don’t apply so much that the ditch starts to get muddy or water flows out of the ditch. You just want to apply enough that the soil starts to settle in the ditch. Once you have settled what you can without making a mess, put on a pair of rubber boots and “walk the ditches”, being careful not to sink in! If you put too much water on, you might get stuck. Once you have completed this step, you can rake a bit more dirt onto the ditches. If you do this right, you won’t have settling problems later.
Nozzle up the Sprinkler Heads:
Before putting nozzles on the heads, turn on each station to flush any dirt out of the lines. Once you have flushed the lines and are certain each valve is operating properly, install the correct nozzles. Double check to make sure heads are straight and installed at the proper grade. Adjust the arc and throw to make sure only the grass and landscape is being watered. Change nozzle sizes where necessary to avoid watering the house, the fence, or the street. Once your system is complete, call for the system to be inspected, if applicable.
Finally, measure the precipitation rate of each zone and water each zone according to its needs. Remember that the needs of the plants will change throughout the seasons. You can calculate the precipitation rate for each zone by measuring the flow rate through the meter in gallons per minute. Take this number, divide by the square feet in this zone and multiply by 96.3. This will give you the average precipitation rate for this zone in inches per hour.
After your system is installed, maintain it regularly. You can have a beautiful landscape and save water with a well-designed system that is properly installed, operated, and maintained.
Again, I hope this is of some value. As always, please help preserve ourwater resources, and irrigate responsibly. If you need any irrigation help, please leave a comments or visit IrrigationRepair.com
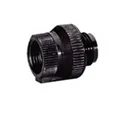
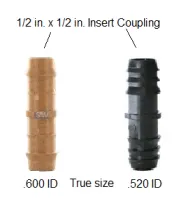 While always buying the same brand of tubing and fittings help it is not a guarantee of fit. The two fittings in the picture are from the same company. They are not interchangeable. If you put the .520” in a .600 ID tube and clamp down tight enough it should hold. You can’t put the .600” in a .520” tube without deforming the tube.
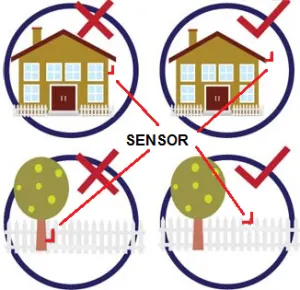 comes down, sensor gets wet. When it gets wet enough it stops irrigation. Some rain sensors suspend irrigation immediately during rain events without need for rainfall accumulation. It rains, they stop.
 Rain/freeze sensor. A rain/freeze sensor handles rain just like the standard rain sensor, either on accumulation or immediately upon rainfall. They add the advantage of shutting irrigation down before the water sprays and icicles and ice patches form on your yard and drive. The most common sensors stop activity when the temperature reaches about 37 degrees. Some models let you choose the shut off temperature, ranging from 35 to 45 degrees. The irrigation remains off until the temperature warms to above the freeze cut off settings. The rain/freeze sensor looks pretty much like a standard rain sensor.
 around. Must be good, right?
 Or
Or 
 Notice the two involving garden hoses? How many of us drink from a garden hose when working outside on a hot summer day? Ever use that same hose to put out pesticides or fertilizer? Have a backflow preventer on the hose bib? Cheap, cheap protection.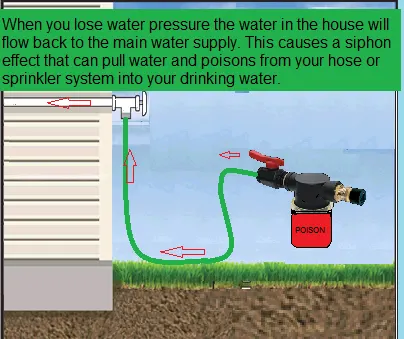
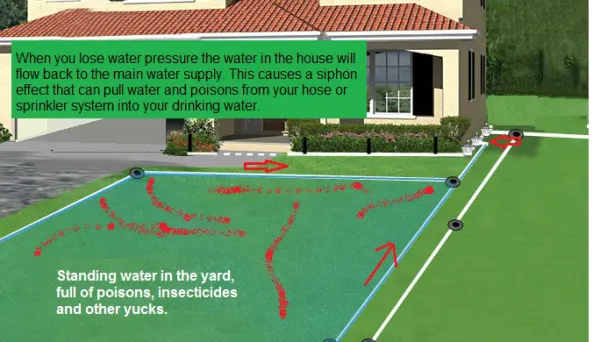 A backflow works by shutting down the irrigation water line when you lose water pressure. The simplest works just like a stopper in your bathtub: a plug falls down, blocks the line. They get far more complicated, depending on application.
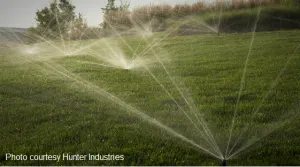 great deal of water out of one nozzle, they produce multiple streams of water of lower volume. These streams come out at different angles, some high, some low, ensuring even coverage. If you have sloped land the slow, even coverage minimizes the chance of water runoff. Blasting gallons of water every minute at sloped land just encourages runoff, as the soil cannot absorb the water as fast as it is applied.
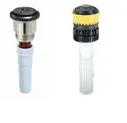 assemblies. The stream nozzles simply swap out with the standard spray nozzles and you are in business. Rain Bird and Hunter have every situation covered.
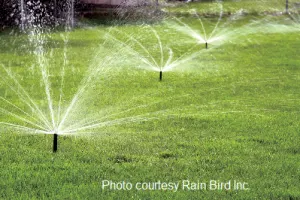 Not sure why you want to get rid of your old nozzles? Two good reasons come to mind. First, the stream nozzles cover up to 30 feet, where spray nozzles stop around 15 to 17 feet. This means that in many systems you can have the same coverage while eliminating a number of heads, saving water. Second, stream nozzles are not as sensitive to breezes as spray nozzles. The droplets are bigger and heavier; they go where they should when standard sprays are being blown away. Wait, I’ll add a third, no charge. A zone with stream rotors can use 30% to 40% less water for the same coverage. Less water = less money.